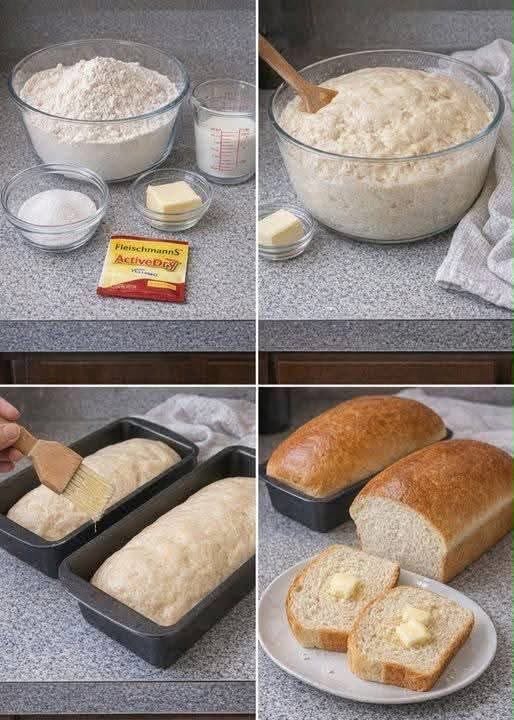
🍞 Homemade Bakery-Style Bread — Soft, Warm & Buttery
🌟 Introduction
There’s nothing quite like the smell of freshly baked bread filling the kitchen. This homemade bread is soft on the inside, beautifully golden on the outside, and incredibly comforting when served warm with a little butter.
The recipe uses simple pantry ingredients and a straightforward yeast dough, making it a great choice for anyone trying homemade bread for the first time. Once you taste a warm slice straight from the oven, you may find yourself wanting to bake it again and again!
🧺 Ingredients
- 1 cup warm milk
- ½ cup warm water
- 2¼ teaspoons active dry yeast
- ¼ cup sugar
- 2 tablespoons butter, melted
- 1 teaspoon salt
- 4–4½ cups all-purpose flour
- Extra melted butter for brushing, optional
👩🍳 Instructions
1. Activate the yeast
Combine the warm milk, warm water, sugar, and active dry yeast in a large bowl. Stir gently and let the mixture stand for about 5–10 minutes.
The yeast should become slightly foamy, which indicates that it is active.
2. Add the butter and salt
Stir in the melted butter and salt.
3. Add the flour
Begin adding the flour gradually, about ½ cup at a time. Stir after each addition until a soft dough begins to form.
You may not need the entire 4½ cups. Stop adding flour when the dough is soft and slightly tacky but no longer excessively sticky.
4. Knead the dough
Transfer the dough to a lightly floured surface and knead for approximately 8–10 minutes, until it becomes smooth and elastic.
You can also use a stand mixer with a dough hook if you prefer.
5. First rise
Place the dough in a lightly greased bowl and cover it with a clean kitchen towel or plastic wrap.
Let it rise in a warm, draft-free place for approximately 1–1½ hours, or until it has roughly doubled in size.
6. Shape the bread
Gently press the dough down to release excess air.
Shape it into one large loaf or divide it into smaller portions and shape them into rolls.
Place the shaped dough into a greased loaf pan or onto a lined baking sheet.
7. Second rise
Cover again and let the dough rise for approximately 30–45 minutes, until noticeably puffy.
8. Bake
Preheat the oven to 375°F (190°C).
Bake the bread for approximately 25–35 minutes, depending on the size and shape of your loaf.
The crust should become beautifully golden brown, and the loaf should sound hollow when gently tapped.
9. Add the butter
As soon as the bread comes out of the oven, brush the top with a little melted butter if desired.
Let it cool slightly before slicing.
🥣 The Best Method
The key to successful homemade bread is paying attention to the dough rather than relying only on the exact amount of flour.
Start with the smaller amount of flour and add more gradually. A dough that is too dry can produce a dense loaf, while a soft, slightly tacky dough generally gives you a lighter and more tender result.
Also, give the dough enough time to rise. Yeast needs warmth and time to create the air pockets that give bread its soft texture.
📜 A Little History of Homemade Bread
Bread has been part of human food traditions for thousands of years. Ancient civilizations discovered that mixtures of grains and water could be transformed into nourishing loaves, while the development of fermentation eventually produced lighter, softer breads.
Yeast-raised bread became especially important in European baking traditions, with families developing their own recipes and techniques over generations.
Today, homemade bread remains popular because it combines simple ingredients with a process that feels both traditional and rewarding.
✨ Benefits of Making Bread at Home
Making your own bread gives you control over the ingredients and allows you to enjoy it fresh.
Some advantages include:
- You can control the amount of sugar and salt.
- You can enjoy bread without unnecessary ingredients.
- Freshly baked bread has an incredible aroma and texture.
- It can be more economical than buying specialty bakery bread.
- Homemade baking can be a fun family activity.
- You can adjust the size and shape according to your needs.
- Leftover bread can be used for toast, sandwiches, French toast, or breadcrumbs.
Of course, bread is one part of a balanced diet, so enjoy it alongside other nutritious foods.
🧈 Serving Ideas
This bread is delicious while still warm with:
- Salted or unsalted butter
- Honey
- Jam
- Scrambled eggs
- Cheese
- Soup
- Stews
- Roasted vegetables
- Chicken or turkey sandwiches
For a simple breakfast, slice the bread, toast it lightly, and spread it with butter and your favorite jam.
❤️ Why Bread Lovers Will Enjoy It
Bread lovers will appreciate the combination of a soft interior, lightly crisp crust, and buttery finish.
It is especially satisfying because you get to experience the entire process—from mixing the dough to watching it rise and finally pulling a golden loaf from the oven.
The aroma alone is enough to make the kitchen feel like a little neighborhood bakery!
🔥 Helpful Baking Tips
Use warm, not hot, liquid: Very hot liquid can damage the yeast. The milk and water should feel comfortably warm.
Don’t rush the rising: If your kitchen is cool, the dough may need additional time.
Don’t add too much flour: Start with less and add gradually until the dough reaches the right consistency.
Let it rest before slicing: Cutting bread immediately can make the inside seem gummy. Give it a little time to settle.
Brush with butter: For a softer, richer crust, lightly brush the freshly baked loaf with melted butter.
🥖 Formation of the Dough
The bread develops its structure through kneading and fermentation.
During kneading, the flour and liquid combine and gluten develops. This creates an elastic network capable of holding the gases produced by the yeast.
During the first rise, the yeast ferments sugars and produces carbon dioxide. Those tiny pockets of gas expand throughout the dough, helping the bread become light and airy.
The second rise allows the shaped loaf to become even more puffy before baking.
Finally, the oven transforms the dough into a golden loaf with a flavorful crust and soft interior.
🍞 Storage
Once completely cooled, keep the bread in an airtight container or bread bag at room temperature for a couple of days.
For longer storage, slice the bread and freeze it in a well-sealed freezer bag. Individual slices can then be warmed or toasted as needed.
🌟 Conclusion
Homemade bread doesn’t have to be complicated. With warm milk, water, yeast, butter, flour, sugar, and salt, you can create a beautiful loaf right in your own kitchen.
The combination of a soft crumb, golden crust, and buttery finish makes this bread perfect for breakfast, sandwiches, dinner, or simply enjoying warm from the oven.
🍞 Fresh bread + melted butter = pure comfort!
And if you’re a true bread lover, this is definitely a recipe worth saving.