🍞✨ THE EASIEST NO-KNEAD HOMEMADE BREAD ✨🍞
I don’t buy bread anymore! 😍
No kneading, no eggs, no butter — just a few simple ingredients and a little patience.
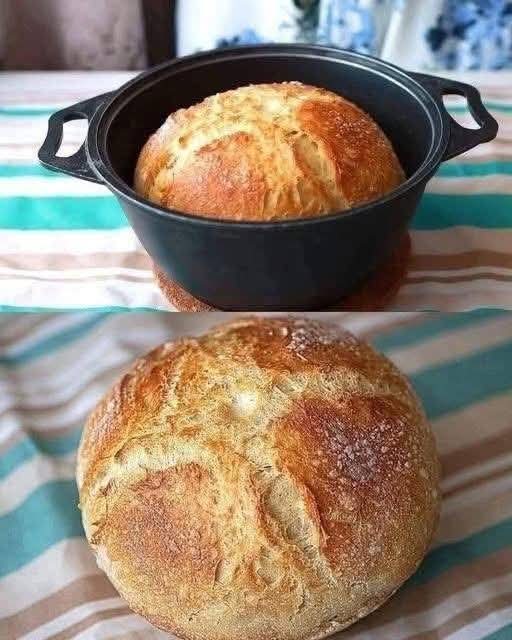
This homemade bread comes out beautifully golden on the outside, soft and airy inside, and is perfect for sandwiches, breakfast, toast, or serving alongside dinner.
💬 Say “BREAD” if you want to save this recipe! 🍞❤️
━━━━━━━━━━━━━━━━━━━━
🌟 INTRODUCTION
There’s nothing quite like the smell of freshly baked bread filling the kitchen.
This easy no-knead recipe is perfect for beginners because you don’t need a stand mixer or complicated bread-making techniques. Simply mix the ingredients, let the dough rise, shape it, and bake.
The result is a rustic loaf with a crisp golden crust and a soft, chewy center.
━━━━━━━━━━━━━━━━━━━━
🛒 INGREDIENTS
🌾 3 cups all-purpose flour
💧 1½ cups warm water
🧂 1½ teaspoons salt
🍞 1 teaspoon active dry yeast
Optional:
🌿 1 teaspoon dried herbs
🧄 ½ teaspoon garlic powder
🌾 Extra flour for shaping
━━━━━━━━━━━━━━━━━━━━
👩🍳 INSTRUCTIONS
1️⃣ Mix the dough
In a large bowl, combine the flour, yeast, and salt.
Pour in the warm water and stir with a wooden spoon until a sticky, shaggy dough forms.
There is no kneading required.
2️⃣ Let it rise
Cover the bowl with plastic wrap or a clean kitchen towel.
Let the dough rest at room temperature for approximately 1½–2 hours, or until noticeably risen and bubbly.
For more flavor, you can let the dough rise slowly in the refrigerator overnight.
3️⃣ Shape the dough
Lightly flour your work surface and turn the dough out onto it.
Gently fold the dough over itself a few times and shape it into a round loaf.
Don’t worry about making it perfect — rustic is part of the charm! ❤️
4️⃣ Preheat the oven
Place a Dutch oven or heavy oven-safe pot with its lid inside the oven.
Preheat to 450°F (230°C) for about 30 minutes.
5️⃣ Bake
Carefully transfer the dough into the hot pot.
Cover with the lid and bake for 30 minutes.
Remove the lid and continue baking for another 10–15 minutes, until the crust is deeply golden.
6️⃣ Cool
Carefully remove the loaf from the pot and place it on a wire rack.
Let it cool for at least 30 minutes before slicing so the inside can finish setting.
━━━━━━━━━━━━━━━━━━━━
🍳 COOKING METHOD
The magic of this recipe comes from time rather than kneading.
The long resting period allows the yeast to ferment the dough and develop flavor while the gluten structure forms naturally.
Baking the dough in a preheated covered pot traps steam during the first part of baking. This helps create a beautifully crisp crust.
Removing the lid near the end allows the outside to become deeply golden and crunchy.
━━━━━━━━━━━━━━━━━━━━
📖 A LITTLE HISTORY
Bread is one of the oldest prepared foods in human history. For thousands of years, people have combined grains, water, salt, and natural fermentation to create loaves in many different forms.
Traditional breadmaking often depended on long fermentation rather than modern mixers and intensive kneading.
The modern no-knead bread method became especially popular because it showed that a flavorful artisan-style loaf could be made at home with very little hands-on work.
━━━━━━━━━━━━━━━━━━━━
💛 INGREDIENT BENEFITS
🌾 Flour provides carbohydrates and forms the structure of the loaf.
🍞 Yeast helps the dough rise and contributes to the bread’s flavor and texture.
💧 Water hydrates the flour and allows the dough to develop properly.
🧂 Salt enhances flavor and helps regulate yeast activity.
This is a simple homemade bread, and its nutritional value will depend on the type of flour and portion size used.
━━━━━━━━━━━━━━━━━━━━
✨ FORMATION & TEXTURE
The perfect loaf should have:
🥖 A crisp golden-brown crust
☁️ A soft, airy interior
🫧 Small and medium air pockets
🌾 A rustic homemade appearance
✨ A pleasantly chewy texture
Don’t slice the bread immediately after baking. Giving it time to cool helps the crumb set and makes slicing much easier.
━━━━━━━━━━━━━━━━━━━━
⏰ PREP, RISE & BAKE
Prep Time: 10 minutes
First Rise: 1½–2 hours
Bake Time: 40–45 minutes
Cooling Time: 30 minutes
Total Time: About 3½ hours
Yield: 1 loaf
🍽️ SERVING IDEAS
Enjoy fresh homemade bread with:
🧈 Butter
🍯 Honey
🥚 Eggs
🧀 Cheese
🥑 Avocado
🍲 Soup or stew
🥗 Salad
🥪 Sandwich fillings
A warm slice with a little butter is hard to beat! 😍🍞
━━━━━━━━━━━━━━━━━━━━
❤️ FOR BREAD LOVERS
If you love homemade bread but don’t enjoy complicated recipes, this one is worth keeping.
There’s something incredibly satisfying about pulling a golden loaf from the oven and knowing that you made it yourself.
It’s inexpensive, simple, rustic, and perfect for everyday meals.
━━━━━━━━━━━━━━━━━━━━
👩🍳 QUICK METHOD
1️⃣ Mix flour, yeast, and salt.
2️⃣ Add warm water.
3️⃣ Stir into a sticky dough.
4️⃣ Cover and let rise.
5️⃣ Shape gently — no kneading!
6️⃣ Bake covered at 450°F (230°C) for 30 minutes.
7️⃣ Uncover and bake 10–15 minutes more.
8️⃣ Cool before slicing. 🍞✨
━━━━━━━━━━━━━━━━━━━━
🌟 CONCLUSION
You don’t need expensive equipment or complicated techniques to make delicious homemade bread.
With flour, water, salt, yeast, and a little patience, you can create a beautiful rustic loaf with a crisp crust and soft center.
Once you try homemade bread this easy, you may never look at store-bought bread the same way! 😍🍞
💬 Would you try this no-knead bread?
❤️ Say “BREAD” if you’re saving this recipe!
━━━━━━━━━━━━━━━━━━━━
💕 FINAL NOTE FOR BREAD LOVERS
Keep this recipe handy for weekends, family dinners, breakfast, or whenever you want the comforting smell of fresh bread in your kitchen.
Mix it. Let it rise. Bake it. Slice it. Enjoy it! 🍞❤️