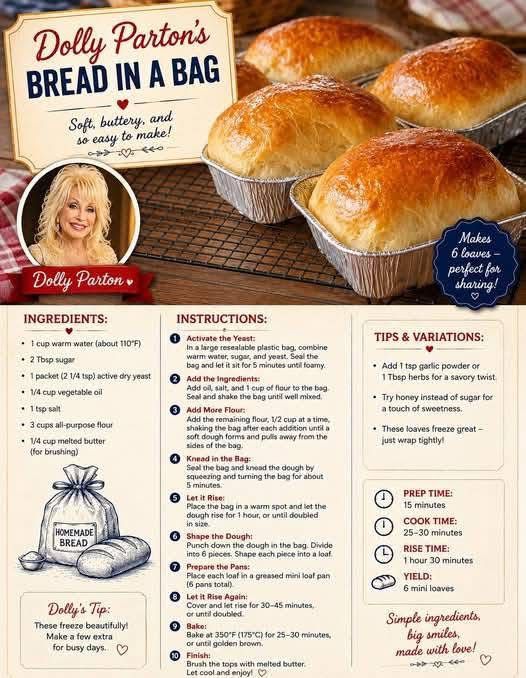
🍞✨ DOLLY PARTON–STYLE BREAD IN A BAG ✨🍞
THIS is what I make when I want homemade bread without making a big mess! 🤎
There’s nothing quite like the smell of freshly baked bread filling the kitchen. But sometimes the thought of flour covering the counter, bowls piling up, and sticky dough getting everywhere is enough to make you reach for store-bought bread.
That’s where this clever Bread in a Bag method comes in! 🍞✨
The dough is mixed inside a sturdy food-safe bag, which keeps most of the mess contained. Once the dough comes together, it’s shaped, allowed to rise, and baked until golden brown.
The result is a soft, homemade loaf with a beautifully golden crust and a tender center—without turning your entire kitchen into a flour-covered disaster. 😍
💬 If you love easy homemade recipes, leave a “THANK YOU” below so you can keep getting more recipes! 🥰
━━━━━━━━━━━━━━━━━━
📝 INGREDIENTS
━━━━━━━━━━━━━━━━━━
🍞 For the Bread
- 3 cups all-purpose flour or bread flour
- 2¼ teaspoons active dry yeast
- 1½ tablespoons granulated sugar
- 1 teaspoon salt
- 1 cup warm water
- 2 tablespoons melted butter or vegetable oil
- 2 tablespoons powdered milk, optional
✨ For the Finish
- 1 tablespoon melted butter
- A little flour for shaping, if needed
Important: The water should be warm, not hot. Very hot water can interfere with the yeast.
━━━━━━━━━━━━━━━━━━
🛍️ WHAT YOU’LL NEED
━━━━━━━━━━━━━━━━━━
- 1 large sturdy food-safe resealable bag
- Measuring cups and spoons
- 1 loaf pan
- Clean kitchen towel
- Cooling rack
A strong bag is important because you’ll be mixing and kneading the dough inside it.
━━━━━━━━━━━━━━━━━━
👩🍳 STEP-BY-STEP METHOD
━━━━━━━━━━━━━━━━━━
STEP 1 — START THE YEAST
Pour the warm water into a small bowl.
Add the sugar and yeast.
Give it a gentle stir and allow it to sit for about 5–10 minutes.
The mixture should become foamy.
That’s a good sign that the yeast is active. 🍞✨
STEP 2 — BUILD THE DOUGH IN THE BAG
Add the flour, salt, and powdered milk if using to the large food-safe bag.
Pour in the yeast mixture.
Add the melted butter or oil.
Seal the bag carefully, leaving a little air inside.
Now comes the fun part! 😄
Gently squeeze and knead the ingredients through the bag until the flour is absorbed and a rough dough begins forming.
━━━━━━━━━━━━━━━━━━
🤎 STEP 3 — KNEAD WITHOUT THE MESS
━━━━━━━━━━━━━━━━━━
Continue kneading the dough through the bag for approximately 5–8 minutes.
The dough should become smoother and more elastic.
If it feels extremely sticky, add a small amount of flour.
If it feels dry and crumbly, add a teaspoon of water at a time.
Don’t add too much flour at once. A slightly soft dough usually produces a more tender loaf.
━━━━━━━━━━━━━━━━━━
⏰ STEP 4 — FIRST RISE
━━━━━━━━━━━━━━━━━━
Leave the dough inside the sealed bag.
Place it somewhere warm and draft-free.
Allow it to rise for approximately 1 hour, or until it has noticeably increased in size.
The exact time depends on the temperature of your kitchen.
While the dough rises, you can clean up—although there shouldn’t be much to clean! 😉🍞
━━━━━━━━━━━━━━━━━━
🍞 STEP 5 — SHAPE THE LOAF
━━━━━━━━━━━━━━━━━━
Once the dough has risen, carefully remove it from the bag.
Place it on a lightly floured surface.
Gently press out some of the air.
Shape the dough into a loaf that fits comfortably inside your greased loaf pan.
Place it into the pan with the seam underneath.
━━━━━━━━━━━━━━━━━━
⏰ STEP 6 — SECOND RISE
━━━━━━━━━━━━━━━━━━
Cover the loaf loosely with a clean kitchen towel.
Allow it to rest for another 30–45 minutes.
The dough should become noticeably puffy.
This second rise helps create a lighter, softer loaf.
━━━━━━━━━━━━━━━━━━
🔥 STEP 7 — BAKE
━━━━━━━━━━━━━━━━━━
Preheat your oven to 375°F (190°C).
Bake the bread for approximately 25–35 minutes, depending on your oven and loaf pan.
The top should become beautifully golden brown.
The loaf should sound hollow when gently tapped on the bottom once removed from the pan.
If the top begins browning too quickly, loosely cover it with foil during the latter part of baking.
━━━━━━━━━━━━━━━━━━
🧈 STEP 8 — THE BEST FINISH
━━━━━━━━━━━━━━━━━━
Remove the bread from the oven.
Brush the warm crust with melted butter.
This gives the loaf a lovely buttery aroma and a softer, flavorful crust. 🤎
Allow the bread to cool on a wire rack before slicing.
Yes, waiting is difficult.
But cutting into very hot bread can make the inside appear gummy, so give it some time to cool. 😍
━━━━━━━━━━━━━━━━━━
📜 A LITTLE BREAD HISTORY
━━━━━━━━━━━━━━━━━━
Bread is one of the world’s oldest prepared foods.
For thousands of years, people have combined grains with water and other ingredients to create simple forms of bread. Over time, fermentation with yeast became an important technique for producing lighter, airier loaves.
Traditional breadmaking usually involves mixing, kneading, rising, shaping, and baking.
The Bread in a Bag method doesn’t change those basic principles—it simply changes where the mixing and kneading happen.
Instead of flour being scattered across a countertop and dough sticking to your hands, much of the messy preparation takes place inside the bag.
It’s a fun example of adapting traditional breadmaking to modern kitchens. 🍞✨
━━━━━━━━━━━━━━━━━━
🌾 WHY THIS METHOD IS SO POPULAR
━━━━━━━━━━━━━━━━━━
🤎 Less mess: Most of the mixing happens inside the bag.
🤎 Beginner-friendly: You don’t need advanced breadmaking skills.
🤎 Simple process: The basic stages are easy to understand.
🤎 Hands stay cleaner: You can knead through the bag instead of handling sticky dough immediately.
🤎 Homemade flavor: You still get the wonderful taste and aroma of freshly baked bread.
🤎 Family-friendly: Kids can enjoy helping squeeze and knead the dough through the bag, with adult supervision.
━━━━━━━━━━━━━━━━━━
🌿 SIMPLE INGREDIENT BENEFITS
━━━━━━━━━━━━━━━━━━
🌾 Flour provides the structure of the loaf.
🍞 Yeast helps the dough rise and creates the characteristic texture of yeast bread.
🧈 Butter or oil adds richness and tenderness.
🍬 Sugar provides a little sweetness and helps support yeast activity.
🧂 Salt balances flavor and plays an important role in dough development.
💧 Water hydrates the flour and allows the dough to develop properly.
As with any bread, this is primarily a delicious source of carbohydrates and is best enjoyed as part of a varied, balanced diet.
━━━━━━━━━━━━━━━━━━
💡 SECRETS TO GREAT HOMEMADE BREAD
━━━━━━━━━━━━━━━━━━
✨ Don’t use water that’s too hot.
✨ Give the yeast enough time to activate.
✨ Don’t overload the dough with flour.
✨ Knead until the dough becomes smooth and elastic.
✨ Let the dough rise somewhere comfortably warm.
✨ Give the loaf enough time for its second rise.
✨ Don’t slice immediately after removing it from the oven.
✨ Brush the warm crust with butter for an extra-special finish.
━━━━━━━━━━━━━━━━━━
🍯 DELICIOUS WAYS TO SERVE IT
━━━━━━━━━━━━━━━━━━
Fresh homemade bread is incredibly versatile!
Try it with:
🧈 Butter
🍯 Honey
🍓 Jam
🥜 Peanut butter
🥑 Avocado
🍳 Eggs
🧀 Cheese
🥣 Soup
🥗 Salad
🍗 Sandwich fillings
For breakfast, toast a slice and spread it with butter and your favorite jam.
For lunch, turn it into a delicious sandwich.
For dinner, serve warm slices alongside soup or your favorite main dish.
━━━━━━━━━━━━━━━━━━
❤️ FOR BREAD LOVERS
━━━━━━━━━━━━━━━━━━
If you’re someone who loves homemade bread but doesn’t love the cleanup, this recipe is made for you! 🍞😍
There’s something special about making bread from scratch.
You mix a few simple ingredients, watch the dough transform, wait patiently while it rises, and then suddenly your kitchen smells like a bakery.
And when you finally cut into that warm loaf?
That’s the reward. 🤎
━━━━━━━━━━━━━━━━━━
📦 STORAGE
━━━━━━━━━━━━━━━━━━
Allow the bread to cool completely before storing.
Keep it in an airtight container or bread bag at room temperature for the best texture over the next couple of days.
For longer storage, slice the bread and freeze it in a well-sealed freezer-safe bag.
Then simply thaw individual slices as needed.
━━━━━━━━━━━━━━━━━━
🍞 FORMATION OF THE PERFECT LOAF
━━━━━━━━━━━━━━━━━━
The journey is simple:
Mix → Knead → Rise → Shape → Rise Again → Bake → Cool → Slice → Enjoy!
Each stage has a purpose.
The yeast creates gas, the developing dough structure holds that gas, the rising periods allow the dough to expand, and baking transforms the soft dough into a golden loaf.
That’s the magic of homemade bread! ✨
━━━━━━━━━━━━━━━━━━
🤎 FINAL CONCLUSION
━━━━━━━━━━━━━━━━━━
This Bread in a Bag recipe proves that homemade bread doesn’t have to mean a kitchen covered in flour.
With a sturdy food-safe bag, a few simple ingredients, some patience, and a warm oven, you can create a beautiful loaf right at home.
It’s soft, comforting, fragrant, and perfect for everything from breakfast toast to family dinner.
🍞 Less mess. More homemade goodness.
And once that buttery golden loaf comes out of the oven, you’ll understand why homemade bread is worth making. 🥰🤎
💬 If you want more easy homemade recipes, type “THANK YOU” below!
❤️ SAVE IT • SHARE IT • BAKE IT • ENJOY IT! 🍞✨