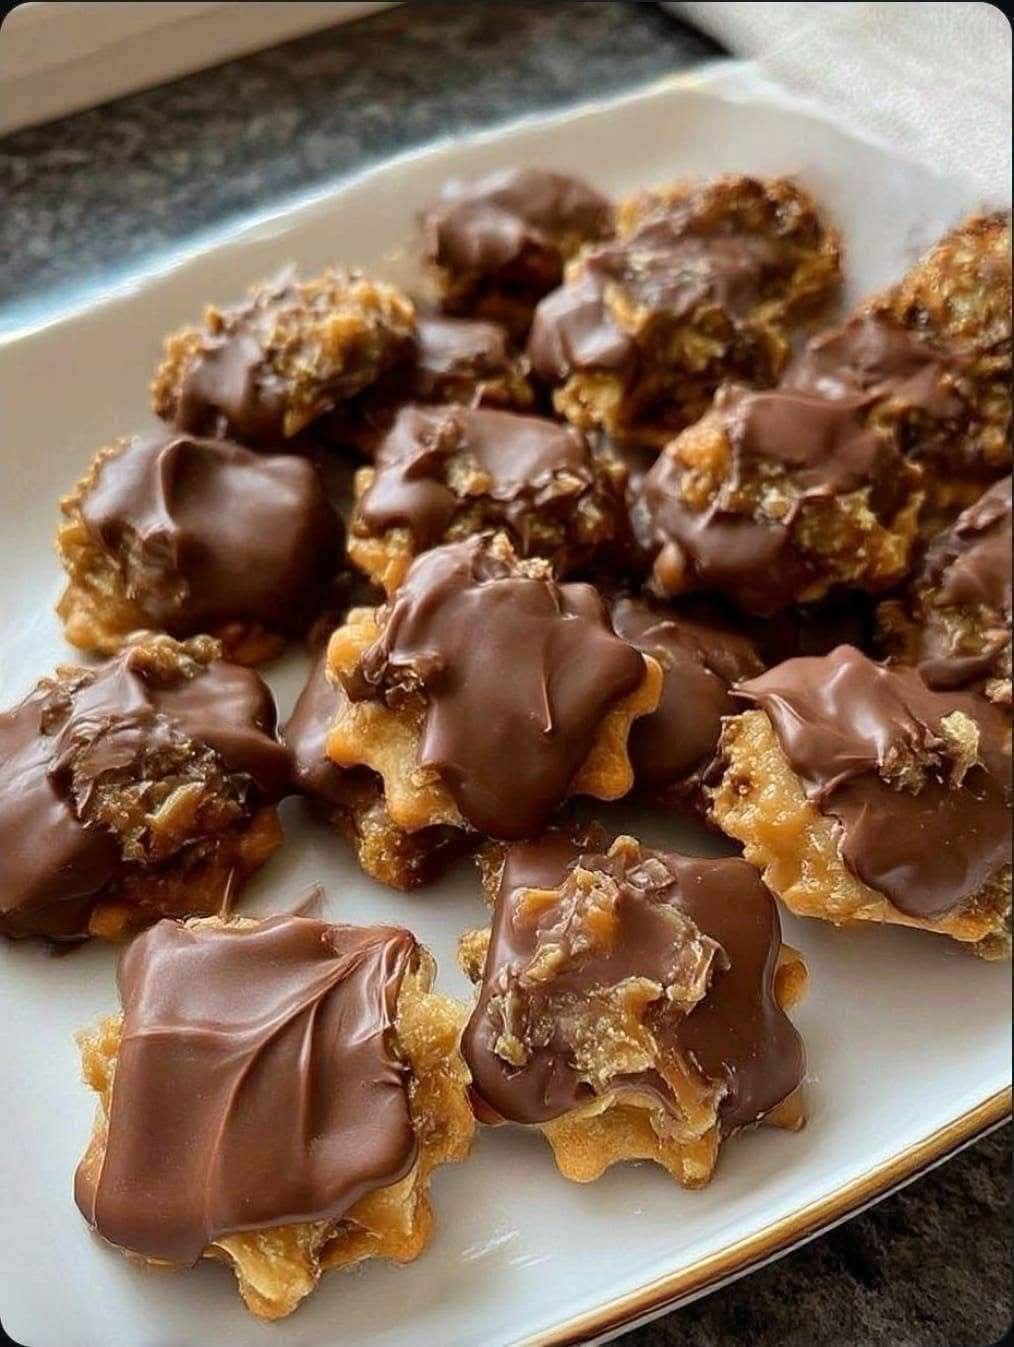
🍫 Homemade Chocolate Caramel Crunch Clusters – Crispy, Buttery & Irresistible!
1. Introduction
Get ready to fall in love with these delicious Homemade Chocolate Caramel Crunch Clusters! If you enjoy sweet, crunchy treats covered in smooth, rich chocolate, this recipe is going to become one of your favorite homemade desserts.
These little bites combine a golden, crispy center with a buttery caramel flavor and a generous layer of melted milk chocolate. Every bite delivers an irresistible combination of crunchy, chewy, sweet, and chocolaty textures.
The best part is that you don’t need complicated baking techniques or expensive ingredients. With a few simple pantry staples, you can prepare these beautiful chocolate treats right in your own kitchen.
They’re perfect for Christmas celebrations, holiday dessert platters, family gatherings, afternoon snacks, or homemade edible gifts.
Once you make them, don’t be surprised if everyone asks for the recipe!
2. Ingredients
For the crunchy caramel mixture:
- 3 cups crispy cornflakes, lightly crushed
- 1 cup chopped roasted peanuts or pecans
- ½ cup unsalted butter
- ½ cup packed brown sugar
- ¼ cup honey or light corn syrup
- 1 teaspoon vanilla extract
- ¼ teaspoon salt
For the chocolate topping:
- 1½ cups milk chocolate chips
- ½ cup semi-sweet chocolate chips
- 1 tablespoon coconut oil (optional)
Optional decorations:
- Chopped roasted peanuts
- Crushed cornflakes
- White chocolate drizzle
- Flaky sea salt
3. Instructions
Step 1: Prepare your baking sheet
Line a large baking sheet with parchment paper.
Make sure the entire surface is covered to prevent the caramel clusters from sticking.
Step 2: Prepare the crunchy ingredients
Place the cornflakes in a large mixing bowl.
Lightly crush them using your hands, leaving some larger pieces for extra crunch.
Add the chopped roasted peanuts or pecans and gently mix.
Step 3: Make the buttery caramel
In a medium saucepan, combine the butter, brown sugar, and honey.
Heat over medium-low heat, stirring continuously until the butter melts and the sugar dissolves.
Allow the mixture to gently bubble for approximately 2–3 minutes.
Remove from the heat and stir in the vanilla extract and salt.
The mixture should look smooth, golden, and glossy.
Step 4: Combine the ingredients
Pour the warm caramel mixture over the crushed cornflakes and chopped nuts.
Using a spatula, gently fold everything together until all the crunchy pieces are evenly coated.
Make sure the caramel reaches all the ingredients.
Step 5: Shape the clusters
Using a tablespoon or small cookie scoop, place small portions of the mixture onto the prepared baking sheet.
Gently press each portion together to form little clusters.
Leave a little space between each one.
Step 6: Cool the clusters
Allow the clusters to cool for approximately 20–30 minutes.
They should become firm enough to handle before adding the chocolate topping.
Step 7: Melt the chocolate
Place the milk chocolate chips and semi-sweet chocolate chips in a microwave-safe bowl.
Heat in 20-second intervals, stirring between each interval until the chocolate is completely melted and smooth.
Add coconut oil if you want a slightly thinner and glossier chocolate topping.
Step 8: Add the chocolate topping
Spoon a generous amount of melted chocolate over each cooled cluster.
Spread gently using the back of a spoon.
Let some chocolate naturally drip down the sides for a beautiful homemade candy appearance.
Step 9: Refrigerate
Transfer the baking sheet to the refrigerator.
Chill for approximately 20–30 minutes, or until the chocolate is completely firm.
Step 10: Serve and enjoy
Carefully remove the clusters from the parchment paper.
Arrange them on a beautiful serving plate.
Your homemade chocolate caramel crunch treats are ready!
4. Different Preparation Methods
Method 1: Traditional stovetop preparation
Prepare the caramel using butter, brown sugar, and honey. Combine with the crunchy ingredients, shape into clusters, and finish with melted chocolate.
Method 2: Oven-toasted preparation
Toast the chopped nuts in a preheated 350°F (175°C) oven for 5–7 minutes before adding them to the mixture. This creates a deeper nutty flavor.
Method 3: Microwave chocolate preparation
Melt the chocolate in short intervals, stirring frequently until smooth.
Method 4: Double-boiler preparation
Place the chocolate in a heatproof bowl over simmering water. Stir gently until melted and glossy.
5. History of Chocolate Caramel Clusters
Homemade chocolate clusters have their roots in traditional American candy-making and home confectionery.
For generations, families have combined nuts, crispy cereals, caramel, and chocolate to create affordable homemade sweets.
Cornflakes became a popular ingredient in homemade candy because they were inexpensive, convenient, and provided a wonderful crunchy texture.
Caramel brought buttery sweetness, while melted chocolate added richness and an attractive finish.
Over time, home cooks created countless variations using peanuts, pecans, almonds, coconut, pretzels, and different types of chocolate.
Today, these little treats are especially popular during Christmas, holiday celebrations, bake sales, and family gatherings.
6. Benefits of Homemade Chocolate Clusters
These treats offer several enjoyable qualities:
- Cornflakes: Provide a satisfying crispy texture.
- Peanuts and pecans: Contain protein, fiber, and beneficial fats.
- Chocolate: Contains cocoa compounds and adds rich flavor.
- Homemade preparation: Allows you to control the ingredients.
- Easy portioning: Small clusters make convenient individual treats.
- Versatility: You can customize the recipe with different nuts and chocolate.
These are indulgent sweets containing added sugar and butter, so enjoy them in moderate portions.
7. Formation, Texture & Presentation
The secret to these beautiful treats is the combination of different textures.
- The center: Golden, crispy cornflakes and crunchy nuts.
- The caramel: Sweet, buttery, and slightly chewy.
- The chocolate: Smooth, rich, and creamy.
- The final texture: A delicious balance of crunchy, chewy, and chocolaty goodness.
For an attractive presentation, arrange the clusters on a white serving platter.
Add a little extra melted chocolate and sprinkle with chopped nuts.
You can also place each cluster inside a small paper candy cup to create a beautiful holiday dessert display.
8. Delicious Variations
Try these wonderful ideas to create different flavors:
- Peanut Butter Chocolate Clusters: Add ¼ cup creamy peanut butter to the warm caramel mixture.
- Dark Chocolate Clusters: Use dark chocolate instead of milk chocolate.
- White Chocolate Crunch: Finish with melted white chocolate.
- Coconut Clusters: Add ½ cup shredded coconut.
- Almond Crunch: Replace the peanuts with roasted almonds.
- Christmas Clusters: Decorate with red and green sprinkles.
- Salted Caramel Clusters: Sprinkle a little flaky sea salt over the chocolate.
9. Storage Instructions
- Room temperature: Store in an airtight container in a cool, dry place for 3–5 days.
- Refrigerator: Keep in an airtight container for up to 2 weeks.
- Freezer: Freeze for up to 2 months in a sealed freezer-safe container.
- Serving: Let refrigerated clusters sit at room temperature for a few minutes before enjoying.
Place parchment paper between layers to prevent sticking.
10. Helpful Tips for Perfect Results
- Use fresh, crispy cornflakes.
- Don’t crush the cereal into powder.
- Stir the caramel mixture continuously.
- Avoid overcooking the caramel.
- Shape the clusters while the mixture is still warm.
- Let the clusters cool before adding chocolate.
- Melt the chocolate slowly to avoid burning.
- Refrigerate until the chocolate is completely firm.
- Use good-quality chocolate for the best flavor.
11. Conclusion
These Homemade Chocolate Caramel Crunch Clusters are the perfect combination of simple ingredients and irresistible homemade flavor.
With their golden crunchy centers, buttery caramel coating, and smooth chocolate topping, they’re guaranteed to become a favorite among family and friends.
Whether you’re preparing a special Christmas dessert, filling a holiday candy tray, making homemade gifts, or simply satisfying your chocolate cravings, these little treats are always a wonderful choice.
They’re easy to prepare, beautiful to serve, and absolutely delicious!
12. For Chocolate Lovers ❤️
If you love crunchy homemade candy, sweet caramel, and rich milk chocolate, this recipe is definitely for you!
Imagine biting into a crispy golden cluster with buttery caramel and a thick layer of smooth chocolate melting in your mouth.
Serve them with coffee, hot chocolate, or a cold glass of milk.
Make a batch, share them with your loved ones, and enjoy every delicious bite!
13. Final Preparation Methods – Quick Summary
| Preparation stage | Time |
| Preparing ingredients | 10 minutes |
| Making caramel | 5 minutes |
| Mixing everything | 5 minutes |
| Shaping clusters | 10 minutes |
| Cooling | 20–30 minutes |
| Melting and adding chocolate | 10 minutes |
| Final chilling | 20–30 minutes |
14. Complete Recipe Details
- Preparation time: 15 minutes
- Cooking time: 5 minutes
- Cooling and setting: 40–60 minutes
- Total time: Approximately 1 hour
- Servings: 20–24 clusters
- Difficulty: Easy
- Category: Homemade Candy / Dessert
- Cuisine: American-inspired
15. Final Conclusion & Sweet Lovers’ Message
Sometimes the most memorable homemade desserts are made with the simplest ingredients!
These Chocolate Caramel Crunch Clusters bring together everything we love: crispy textures, buttery caramel, crunchy nuts, and smooth melted chocolate.
They’re perfect for sharing, gifting, holiday celebrations, or enjoying whenever you want something sweet.
Would you eat just one, or would you finish the whole plate? 😍🍫
Leave a big YUM in the comments if you love chocolate-covered homemade treats, and save this recipe for later! ❤️
9
9