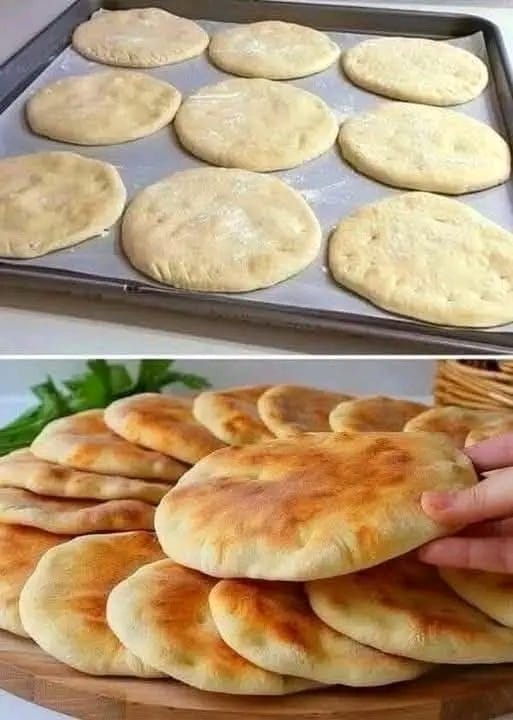
I Don’t Buy Bread Anymore! 🍞 No Kneading, No Eggs, No Butter — The Easiest and Cheapest Homemade Bread Recipe!
Introduction
What if I told you that you could make delicious homemade bread with just a few basic ingredients, without kneading the dough, without eggs, and without butter?
Yes, it’s possible!
This easy homemade bread recipe is perfect for anyone who wants fresh, warm bread without spending a fortune at the bakery. The dough comes together in just a few minutes, requires very little hands-on work, and uses simple ingredients that many people already have in their kitchens.
The secret is letting time do the hard work. Instead of kneading the dough for a long time, you simply mix the ingredients, allow the dough to rise, and bake it until the crust turns beautifully golden.
The result is a rustic loaf with a crisp crust and a soft, airy interior. Serve it with soup, cheese, olive oil, jam, or your favorite meal.
Once you try this easy recipe, you may find yourself making homemade bread much more often!
Preparation and Cooking Time
- Preparation time: 10–15 minutes
- Rising time: 1–2 hours
- Baking time: 30–40 minutes
- Total time: Approximately 2–3 hours
- Yield: 1 medium loaf
Ingredients
You only need four basic ingredients to make this simple bread.
- 3 cups (375 g) all-purpose flour
- 1½ cups (360 ml) lukewarm water
- 2¼ teaspoons (7 g) instant yeast
- 1½ teaspoons salt
Optional: A little flour for dusting the work surface.
There are no eggs, no butter, and no kneading required!
Instructions
Step 1: Mix the dry ingredients
In a large mixing bowl, combine the flour, instant yeast, and salt. Stir well so the ingredients are evenly distributed.
Step 2: Add the water
Pour the lukewarm water into the bowl. Mix everything with a wooden spoon until a sticky, rough dough forms.
Don’t worry if the dough looks wetter than traditional bread dough. This recipe is designed to be easy, and the dough does not need to be smooth.
Step 3: Let the dough rise
Cover the bowl with a clean kitchen towel or plastic wrap. Leave it in a warm place for approximately 1–2 hours, or until the dough has noticeably expanded and looks bubbly.
The exact rising time depends on the temperature of your kitchen.
Step 4: Prepare the baking tray
Preheat your oven to 220°C (425°F). Line a baking tray with parchment paper or lightly grease a suitable baking dish.
Step 5: Shape the dough gently
Lightly flour your hands and work surface. Carefully transfer the dough and fold its edges toward the center a few times.
You do not need to knead it. Handle it gently to preserve the air bubbles created during rising.
Shape it into a round or oval loaf and place it on the prepared tray. If the dough is too sticky to shape easily, use a spoon or scraper and bake it in a loaf pan instead.
Step 6: Bake the bread
Place the loaf in the preheated oven and bake for approximately 30–40 minutes, until the crust is golden brown and the bread is cooked through.
For a crispier crust, place a heatproof pan of hot water on the lower oven rack during the first part of baking, taking care to avoid steam burns.
Step 7: Let it cool
Remove the bread from the oven and allow it to cool on a wire rack for at least 20–30 minutes before slicing.
This final step helps the inside finish setting and keeps the slices from becoming gummy.
The No-Knead Method Explained
The beauty of this recipe is that it uses time instead of hard work.
Traditional bread recipes often require repeated kneading to develop gluten, the protein network that gives bread its structure. In no-knead bread, the flour absorbs water during resting, while yeast fermentation helps develop flavor and an airy texture.
Here is the simple method:
- Mix the ingredients.
- Cover and allow the dough to rise.
- Shape it gently without kneading.
- Bake until golden.
- Cool before slicing and serving.
That’s all! You don’t need a stand mixer, special bread-making equipment, or expensive ingredients.
A Brief History of Homemade Bread
Bread has been an essential food in many cultures for thousands of years. Ancient communities discovered that mixing grains with water produced a simple staple that could be cooked over heated stones or in basic ovens.
Over time, people learned to use fermentation to make bread lighter and more flavorful. Different regions developed their own traditions, from flatbreads and rustic country loaves to sourdough and enriched breads.
In many households, bread-making became a practical way to feed families using affordable pantry staples. No-knead recipes continue that tradition by making homemade bread more accessible to busy people and beginner cooks.
Although this particular recipe is a modern, simplified version, it follows the same basic principle: flour, water, yeast, salt, and patience can produce wonderful bread.
Benefits of This Homemade Bread Recipe
1. Budget-friendly
Flour, water, yeast, and salt are inexpensive ingredients. Making bread at home can help reduce bakery spending, especially when you prepare it regularly.
2. No kneading required
This method saves effort and is ideal for people who don’t enjoy working dough by hand.
3. No eggs or butter
The recipe contains neither eggs nor butter, making it useful for people who want to avoid these ingredients. It is also naturally dairy-free when prepared with suitable equipment and ingredients.
4. Simple ingredients
You know exactly what goes into your loaf and can adjust the salt or choose a different flour if desired.
5. Fresh and delicious
Homemade bread can be enjoyed warm from the oven, with a fragrant crust and a soft interior.
6. Easy to customize
You can experiment with whole-wheat flour, dried herbs, seeds, or spices. Keep in mind that changing the flour or adding ingredients may require adjustments to the water and rising time.
7. A satisfying kitchen activity
Making bread can be a relaxing way to prepare food for your family and share something homemade with friends.
Nutrition Information
The following figures are estimates for the entire loaf, assuming the listed ingredients and no added oil or butter.
- Calories: Approximately 1,450–1,550
- Protein: Approximately 40–45 g
- Carbohydrates: Approximately 300–320 g
- Fat: Approximately 4–6 g
Per slice, the values depend on the loaf’s final weight and how many slices you cut. For example, dividing the loaf into 12 equal portions gives roughly 120–130 calories per portion.
These estimates are not a substitute for a nutrition calculation based on your exact ingredients. This bread contains wheat and gluten.
What to Serve with Homemade Bread
This simple loaf goes beautifully with many meals.
- Breakfast: Serve with olive oil, olives, cheese, honey, or jam.
- Lunch: Pair it with vegetable soup, lentils, beans, or a fresh salad.
- Dinner: Enjoy it alongside roasted vegetables, stews, or grilled dishes.
- Snacks: Toast a slice and top it with tomatoes, garlic, or your favorite spread.
For a Moroccan-inspired serving idea, enjoy it with olive oil, olives, and mint tea, or serve it alongside a bowl of warm harira.
Storage Tips
At room temperature: Once completely cool, store the bread in a clean bread bag or airtight container for about 2–3 days.
In the refrigerator: Refrigeration can make bread go stale faster, so room-temperature storage is generally preferable for short-term use.
In the freezer: Slice the cooled loaf and freeze it in a sealed freezer bag for up to 2–3 months for best quality. Take out individual slices as needed and toast or reheat them.
If you notice mold, discard the entire loaf rather than cutting away only the affected part.
Common Mistakes to Avoid
- Using water that is too hot: Very hot water can damage the yeast. Use lukewarm water instead.
- Adding too much flour: A sticky dough is normal for this recipe. Too much extra flour can make the bread dense.
- Rushing the rise: Give the dough enough time to become puffy and bubbly.
- Opening the oven repeatedly: This can cause heat loss and interfere with even baking.
- Cutting too soon: Let the loaf cool before slicing for a better texture.
Conclusion: Simple Bread, Big Happiness!
Who says you need expensive ingredients, a bread machine, or hours of kneading to make delicious homemade bread?
With just flour, water, yeast, and salt, you can prepare a beautiful loaf with a golden crust and a soft center. The process is simple, economical, and suitable even for beginners.
Whether you are trying to save money, reduce trips to the bakery, or simply enjoy the pleasure of homemade food, this no-knead bread recipe is a wonderful place to start.
Bake it once, share it with your family, and enjoy the wonderful smell of fresh bread filling your kitchen.
For the Love of Homemade Bread ❤️
If you love easy, affordable recipes that bring people together, this one is for you!
Please like, share, and save this recipe so you can find it whenever you need fresh homemade bread. Leave a comment and tell us: Do you prefer your bread with a crispy crust or a soft crust?
Thank you for supporting our recipes and being part of this wonderful cooking community. Your comments, shares, and love encourage us to keep sharing simple recipes that everyone can enjoy.
Happy baking, and may your kitchen always smell like freshly baked bread! 🍞❤️